前言
一个很简单的问题,搞了两个小时,原来是这个原因!!!,QT5中的INCLUDEPATH的路径不能太深。。。。。所以我直接把文件复制到D盘,然后配置成功了。
方法
如果你安装的是使用Microsoft Visual Studio编译器的Qt(例如我安装的这个Qt),则不需要网传的对OpenCV进行编译的这个麻烦过程,直接利用VS的预编译文件即可。
Qt程序的项目配置文件保存在.pro文件里,类似于VS2012中所配置的,Qt也没有“全局”的INCLUDE和LIB(库)路径的修改功能,而是通过对pro文件的改动来配置编译时需要包含的路径和库文件。
其中Pro文件我直接贴出来我的,自己改下目录即可:
#-------------------------------------------------
#
# Project created by QtCreator 2017-04-17T22:46:23
#
#-------------------------------------------------

QT       += core gui

greaterThan(QT_MAJOR_VERSION, 4): QT += widgets

TARGET = <a href="https://www.ixxin.cn/tag/qt5/" title="查看更多关于QT5的文章" target="_blank">QT5</a><a href="https://www.ixxin.cn/tag/opencv/" title="查看更多关于Opencv的文章" target="_blank">Opencv</a>2411
TEMPLATE = app


SOURCES += main.cpp\
        mainwindow.cpp

HEADERS  += mainwindow.h

FORMS    += mainwindow.ui

INCLUDEPATH += D:/opencv_build/include

win32:CONFIG(debug, debug|release): {
LIBS += -LD:/opencv_build/x86/vc10/lib \
-lopencv_core2411d \
-lopencv_imgproc2411d \
-lopencv_highgui2411d \
-lopencv_ml2411d \
-lopencv_video2411d \
-lopencv_features2d2411d \
-lopencv_calib3d2411d \
-lopencv_objdetect2411d \
-lopencv_contrib2411d \
-lopencv_legacy2411d \
-lopencv_flann2411d
} else:win32:CONFIG(release, debug|release): {
LIBS += -LD:/opencv_build/x86/vc10/lib \
-lopencv_core2411 \
-lopencv_imgproc2411 \
-lopencv_highgui2411 \
-lopencv_ml2411 \
-lopencv_video2411 \
-lopencv_features2d2411 \
-lopencv_calib3d2411 \
-lopencv_objdetect2411 \
-lopencv_contrib2411 \
-lopencv_legacy2411 \
-lopencv_flann2411
}
记得每次修改Pro文件都要Qmake一下,然后构建,还有一个重要的问题就是路径不要太深。
详细配置的话请看:http://www.librehat.com/qt-5-2-vs2012-opencv-2-4-7-dev-environment-setup-tutorial/
或者:http://blog.csdn.net/skelking/article/details/43735971
测试DEMO
这个也是我复制别人的,然后改了一个小地方就运行起来了。
/*
 * FileName : main.cpp
 * Author   : xiahouzuoxin @163.com
 * Version  : v1.0
 * Date     : Sun 23 Nov 2014 04:29:47 PM CST
 * Brief    :
 *
 * Copyright (C) MICL,USTB
 */
#include <QApplication>
#include <QWidget>
#include <QImage>
#include <QLabel>
#include <QPushButton>
#include <QHBoxLayout>
#include <QVBoxLayout>
#include <QFileDialog>

//#include <cv.h>
#include <opencv/cv.h>
#include<opencv2/highgui/highgui.hpp>

using namespace cv;

static QImage Mat2QImage(Mat& image)
{
    QImage img;

    if (image.channels()==3) {
        cvtColor(image, image, CV_BGR2RGB);
        img = QImage((const unsigned char *)(image.data), image.cols, image.rows,
                image.cols*image.channels(), QImage::Format_RGB888);
    } else if (image.channels()==1) {
        img = QImage((const unsigned char *)(image.data), image.cols, image.rows,
                image.cols*image.channels(), QImage::Format_ARGB32);
    } else {
        img = QImage((const unsigned char *)(image.data), image.cols, image.rows,
                image.cols*image.channels(), QImage::Format_RGB888);
    }

    return img;
}

int main(int argc, char *argv[])
{
    QApplication app(argc, argv);

    QWidget *wn = new QWidget;
    wn->setWindowTitle("disp image");

    QString filename = QFileDialog::getOpenFileName(0, "Open File", "", "*.jpg *.png *.bmp", 0);
    if (filename.isNull()) {
        return -1;
    }

    Mat image = imread(filename.toStdString(), 1);
    QImage img = Mat2QImage(image);

    QLabel *label = new QLabel("", 0);
    label->setPixmap(QPixmap::fromImage(img));

    QPushButton *bnt = new QPushButton("Quit");
    QObject::connect(bnt, SIGNAL(clicked()), &app, SLOT(quit()));

    QVBoxLayout *layout = new QVBoxLayout;
    layout->addWidget(label);
    layout->addWidget(bnt);
    wn->setLayout(layout);

    wn->show();

    return app.exec();
}
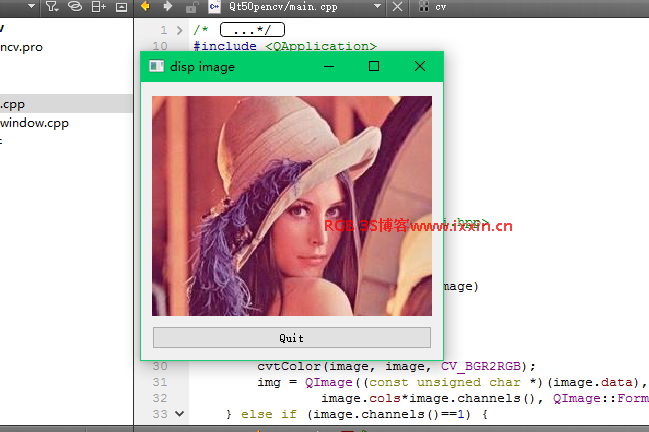
运行结果: